Windows Search Indexing Tips & Tricks
1] Configure Windows 11/10 Search Indexing
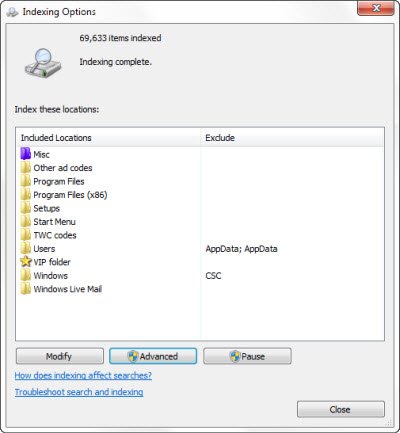
You can configure your Windows Search and Indexer to suit your requirements. To do so, you will have to open the Indexing Options via Control Panel > All Control Panel Items > Performance Information and Tools.
Here you will see the locations which are being indexed. You can also Modify the Index locations. If you wish, at any point in time, you can pause indexing here, for 15 minutes at a time, by clicking on the Pause button. The Advanced button gives you some more options, which we will see below. All this is managed by SearchIndexer.exe.
2] What is SearchIndexer.exe
You may have come across a process called the SearchIndexer.exe in your Windows Task Manager. This process is the actual service that manages the indexing of your files for Windows Search.
If you right-click on this process and select Go to Service, you will see that a Windows Service called WSearch is associated with it. The WSearch service provides and manages content indexing, property caching, and search results in Windows operating system. If at any point in time you find that you wish to terminate this process, you should click on End Process Tree to terminate it as well as its related processes. Read: What is Search Indexing and how does it affect searching in Windows 10?
3] Location of Windows Search Index
By default, the Windows Search Index is situated at the following location: C:\ProgramData\Microsoft\Search. But if you want to change its location, you can do it easily. Go here to see how to change the location of the Windows Search Index. This operation will restart Windows Search Service, and indexing will take place afresh and be saved at this new location.
4] Add or remove folders to be indexed
The easiest way to add anything to the search index is to include it in the Library. But you can also do so via the Indexing Options. Clicking on Modify will open a dialog box that will show all the currently indexed locations.
Here, you can add or remove index locations and decide which folders you’d like to add or to be removed. By default, most of the common user files on your computer are indexed. Indexed locations include all folders included in Libraries, e-mail, and offline files. Windows folder, Program files and system files are normally not indexed. You should include only those folders which you routinely search, else your index may become too large, which in turn may slow down your regular searches. Read: How to change the location of Search Index.
5] Add or Remove File Types to be indexed
The Windows Search Indexer has a set list of default file types that it indexes. But if you wish, you can change these file types. To do so, click on the Advanced button in the Indexing Options.
In the box which opens you will be able to check, un-check file types to select or de-select them, and even add a new file extension to the list.
6] Index Encrypted Files
Under the Advanced tab of the Indexing Options, you can also set it to encrypted index files. You can see the last image in this post. But before you add encrypted files to the index, it is recommended that you have Windows BitLocker (or a non-Microsoft File Encryption Software) enabled on your system drive for security purposes. If you don’t Windows may show you a yellow security warning saying Cannot Verify Files.
7] Disable searchindexer.exe or Search Indexer
People often recommend that you disable the Search Indexer to save resources and make your Windows computer faster. But this is not exactly true. The Indexing takes place, only when your computer is idle. When it is busy, indexing is paused. But nevertheless, if you do not use the Windows Search frequently and would like to disable Windows Search, you can do so as follows: Open Control Panel > Programs and Features > Turn Windows Features on or off. Here uncheck the Indexing Service checkbox. Click OK and Restart the computer.
Additionally, you could also open Services.msc and navigate to Windows Search service. Right-click on it and select Properties.
Here set its startup type to Disabled. Click Apply/OK and restart your computer. Read: How to Reset Windows Search in Windows.
8] Rebuild Search Index and Restore Search Defaults
If you feel that your search index has corrupted, you can rebuild your search index easily.
To do so, open Control Panel > System & Maintenance > Indexing Options. In the Advanced Options, Click on Restore Defaults and Rebuild Index. Click OK. Read: Indexer Diagnostics Tool will help fix Windows 10 Search Indexer problems.
Windows Search Indexer has stopped working
If you find that your Search Indexer is not working correctly, you may want to check our tutorial on how to Troubleshoot Windows Search Indexer errors based on which the first MVP Fix It was released. If you are facing problems with Windows Search itself, check out the Windows Search Troubleshooter. Read next: Fix SearchIndexer.exe High Disk or CPU usage. Do let us know if you have any additional tips to share!