Public Wi-Fi’s are great for their convenience, but sometimes they can be extremely frustrating. This is when you are outside and trying to connect to the internet, but the public Wi-Fi login page doesn’t show up on your Windows 10 browser. When in such a situation, don’t panic as there are easy fixes available to solve this issue.
Public Wi-Fi Login Page not showing on PC
If the Public Wi-Fi Login Page not showing when you use a Windows 10 PC, these tips may help you in connecting to the public network Wi-Fi: Let’s look at each of these ways in detail.
1] Restart Your System
If this problem is happening for the first time on your system, then you should try this initial workaround.
Turn off your Wi-Fi, then turn it back on.If the above didn’t work, try logging out of your account on your computer and then log back in.Simply Restart the system.
If none of the above are working, try to ask a few people around you and check if they can use the internet. Possibly that Wi-Fi connection is down, or the router needs to be restarted.
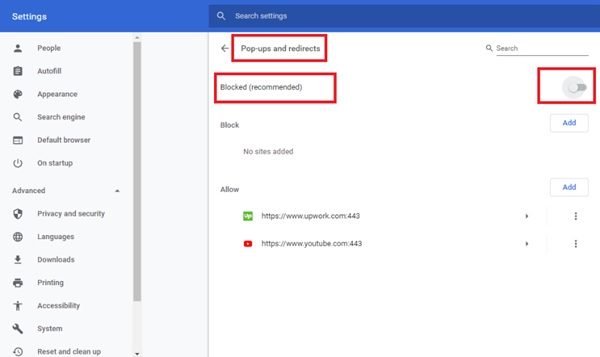
2] Disable Pop-Up blocking
If you have Pop-ups blocked on your system, the Public Wi-Fi login page won’t show up. You will have to disable popup blocking from your settings. Here’s how you can do that in Chrome:
In Chrome Brower, click on the three dots appearing on the left most cornerHit SettingsScroll down and click AdvancedScroll down further and click Site settingsNow, scroll down and click the Pop-ups and redirects optionEnable the Pop-ups by clicking on the slider beside Blocked (recommended) optionNow, you will see Allowed instead of Blocked (recommended)
Close the settings tab and try to access the Public Wi-Fi login Page from your browser.
3] Flush DNS cache
Windows stores DNS server’s data of websites in the cache. You may face this problem if the IP of the login page of the public Wi-Fi has changed recently. Try flushing DNS cache to solve this error:
Press ‘Win Key + R’ to launch the ‘Run Dialog’Type ‘cmd’ and hit ‘Enter’Now enter the command ‘ipconfig /release’ and hit ‘Enter’You will have to wait for a few minutes for the process to completeNow enter the command ‘ipconfig /flushdns’ in the command prompt window and hit ‘Enter’Enter the command ‘ipconfig /renew’ and hit ‘Enter’ once again
Wait for few minutes for this process to complete the process. Once done, try to access the Public Wi-Fi login page to check the problem is persists.
4] Open Router’s Default Page
If none of the above fixes work, then you should try to open the router’s default page. Follow the below steps:
Connect to the public Wi-Fi and go to your web browserIn the address bar type ‘0.0.1’ or ‘192.168.1.1’ or ‘http://localhost’ and then press ‘Enter’; to get on to the router’s login page
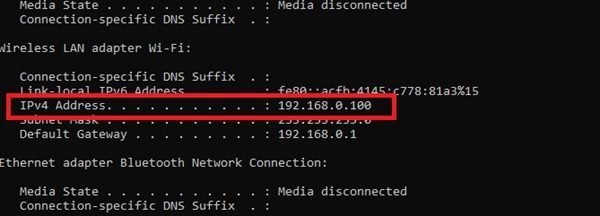
Most of the time, this issue should be solved by doing only this. But if these steps do not work, you will need to find the IP Address of the connected router and then paste the same in your browser. Follow the below steps to find the IP address of the router:
From the ‘Start Menu’ go to the ‘Search’ boxType ‘cmd’ to open Command PromptOnce open, type ‘ipconfig’ and hit ‘Enter’Now locate the ‘IPv4 address’ under the ‘Wireless LAN adapter Wi-Fi’
This is a pretty simple method that you can use to manually access the router’s login page. Once you get the IPv4 Address, paste it into your browser and hit enter to start using the internet.
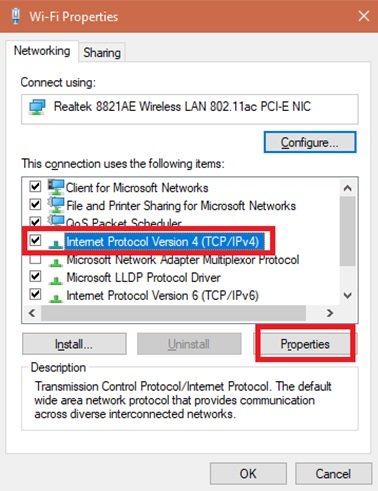
5] Turn off Third-Party DNS Servers
Sometimes third-party DNS servers like OpenNIC, Dyn, Google Public DNS server, etc. prevent a public Wi-Fi from connecting properly. To solve this problem, you will have to turn off the third-party DNS servers. Here’s how you can do this:
Go to ‘Settings’ and click ‘Network & Internet’Scroll down to go to ‘Open Network and Sharing Center’ and click to open itNow click on the Wi-Fi and select ‘Properties’In the new tab, locate ‘Internet Protocol Version 4(TCP/IPv4)’Click on it, and select ‘Properties’Enable ‘Obtain an IP address automatically’ and ‘Obtain DNS server address automatically’Hit ‘OK’
Please note, this method will work only for users who have a third-party DNS server on their computer.
6] Disable Firewall on Your System
Sometimes Windows Firewall can cause this problem, and disabling the same can save your day. Follow these steps:
Press ‘Win Key + R’ to launch the ‘Run Dialog’Type ‘control firewall.cpl’ and hit ‘Enter’ to open ‘Firewall settings’ in ‘Control Panel’On the left pane of the control panel, click on ‘Turn Windows Defender Firewall on or off’Now, under the Public network settings, click on ‘Turn off Windows Defender Firewall (not recommended)’ and hit ’OK’ to turn your Firewall offRestart the system
Try accessing the public Wi-Fi login page. And yes, do not forget to turn on the firewall once done. If you still face trouble, try the next fix.
7] Open Incognito browser window
Irrespective of the browser you are using, i.e., Edge, IE, Chrome, Safari, Opera, or Firefox, an Incognito mode will always be available. One of the biggest perks of using this mode is that it allows you to browse the internet privately. In simple words, it doesn’t store the caches while browsing. After opening the incognito window, you should try to visit a non-HTTPS website, such as stealmylogin.com. Sometimes it happens that the browser cache tries to use the DNS info to load a site instead of loading the login page. In such a case, this trick works. If you are among those who regularly use public Wi-Fi, then this article will surely help you to stay connected to the internet. So, the next time you can’t connect to public Wi-Fi, try these fixes to force the Wi-Fi login page to show up on Windows. Read next: Dangers of using Public WiFi and precautions to take.