How to slice Text in Photoshop
Creating sliced text in Photoshop can be done in a few ways. When you have worked with the many tools and features in Photoshop, you can easily figure out what tools and processes will work for a project. Sliced texts can be used in advertisements as they visually represent the word. This article will show two ways that the text can be sliced.
1] Create sliced Text in Photoshop using the Rectangular Marquee tool
Open Photoshop and Create New Document
This method of using the rectangular marquee tool is very simple. Open Photoshop and create a new document. To create the new document go to File then New, a New document options window will appear, fill out the options that you want then press Ok to confirm. The canvas will be created for you to work on.
Create Text
With the canvas now created, go to the left tools panel and click on the Horizontal type tool(you can also use the vertical type tool if you wish). Click on the canvas and when the cursor appears, type the word that you want to slice. When you are finished typing, press the Move tool or the Commit any current edits icon (Tick icon on the top toolbar). If the text is too big or too small you resize it by pressing Ctrl + T then hold Shift + Alt and click, hold and stretch a point to resize the text. Holding Shift + Alt while dragging will make the text resize from the center instead of just one side. This will make it resize proportionately. Dragging the top, bottom, left, or right points while holding Shift + Alt will make the text resize from two points (top and bottom proportionately). However, clicking and dragging a diagonal point while holding Shift + Alt will make the text resize from all four sides proportionately.
Duplicate text
The next step is to duplicate the text layer. To duplicate the text layer, click it and drag it down to the Create a new layer icon at the bottom of the layers panel. You can also duplicate the text layer by going to the top menu bar and clicking Layer then Duplicate layer. The shortcut for duplicating a layer is Ctrl + J.
Change the color of one text
When the text is duplicated, they will be the same color, this will make it hard to work on them so change the color of one text. to change the color, right-click on one of the layers and choose Blending options. When the Blending Options window appears, click on the word Color overlay then choose a color. This color is just for working purposes only so you will change to your desired color when you are done.
These are the two colors, you can choose your own colors. The texts will stay in the same position with one hidden behind the other. These are only separated to show the two colors. They need to be one in front of the other so that the slice can be precise on both.
You can choose to color code the layers by right-clicking on the layer and then choosing a color, you can choose green for the green layer and red for the red layer.
These are the layers that are color coded for easy identification.
Rasterize both layers
The next step is to Rasterize both layers. To rasterize the layers, go to the layers panel, right-click on the layers then choose Rasterize type. This will make the text editable and can be erased or cut with the tools. Note that when the text is rasterized, the font type cannot be changed, you cannot correct the spelling, etc. Make all changes and edits before rasterizing the text. You can, however, edit the colors and add other effects after the text has been rasterized.
Cut with the Rectangular marquee tool
The next step is to cut the text, and the Rectangular marquee tool is what will be used for this method.
Select one of the layers, go to the left tools panel and select the Rectangular marquee tool. Create the rectangle over the top of the text, at the point that you want to cut (whether half or quarter or what fits your project). When the marquee tool is at the desired position, press delete. In this case, the red layer is selected which is the layer at the top. When you press delete, the part where the rectangular marquee is placed will be deleted. Since the bottom layer is green, the green will show. The next step is to click on the other layer and then move the Rectangular marquee tool to the uncut part. Go to the layers panel and click on the other layer then use the down arrow and move the Rectangular marquee down to the other part. This will allow the second cut on the second layer to match the cut on the previous layer. When the Marquee tool is where you want it to be, press delete. When you press delete you will not see the difference, however, you can click and move the bottom pieces and you will see the two pieces come apart. You can choose to make both pieces the same color or keep both pieces in different colors.
Make additional edits
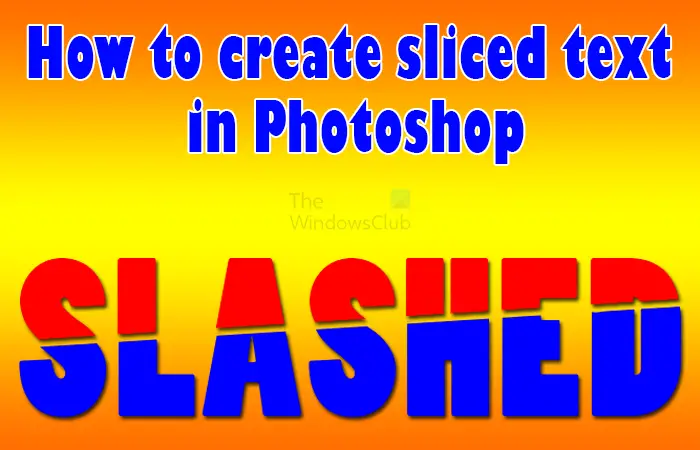
Now that the text is sliced, you can make the changes that you need to make so that it fits your projects. You can adjust a part of the text so that it is slanted to bring match what it may look like when an object is slashed. This is the final artwork with the other elements added to make an advertisement for a sale.
2] Slash Text in Photoshop using the Polygonal Lasso tool
Create text
As with the first method, open Photoshop and then create the document. When the document is created, write the text.
Duplicate layer
The next step is to duplicate the layer. This step is not necessary as you can cut the text and then copy and paste it on a new layer. Since the duplicate layer was used for the first method, I will use the other method to get the two pieces apart.
Rasterize the layers
The next step is to Rasterize the layers. To rasterize the layers, go to the layers panel, right-click on the layers then choose Rasterize type. This will make the text editable and can be erased or cut with the tools. Note that when the text is rasterized, the font type cannot be changed, you cannot correct the spelling, etc. Make all changes and edits before rasterizing the text. You can, however, edit the colors and add other effects after the text has been rasterized.
Cut with the Polygonal lasso tool
The next step is to use the Polygonal lasso tool to cut the text. the Polygonal lasso tool offers more ways to cut the text. To use the polygonal lasso tool, go to the left tools panel and select the Polygonal lasso tool, then click in straight lines from a start point and then click until you close off at the starting point. When you are satisfied with the selection, click the Move tool. This will cut the text along the selected lines. You can then move both pieces as they are now separate.
Cut piece
With part of the text still having the selection around it, go to the top menu and click Edit then Cut.
Create New layer and paste
Go to the bottom of the layers panel and click the Create new layer icon. You may also use the shortcut Ctrl + Shift + N to create a new layer. While on the new layer go to the top menu and click Edit then Paste. You may also choose to click Paste special then choose Paste in place. This will paste the cut object in the exact position it was cut from. You will notice that when you cut the piece and it has disappeared, waiting to be pasted, there is the outline left. You can erase this outline if you are not going to paste in place or if you will be moving the cut part further apart from where it was cut from. In this example, you will see that the piece that was cut and pasted is yellow. This is so because when the original text was written it was yellow. I went into the Blending options and changed it to blue. The cut piece reverted to the original color when it was pasted. You can choose to keep them separate colors or make them the same color. This is the final artwork with the other elements added to make an advertisement for a sale. Read: How to create Pattern using Custom Shape Tool in Photoshop
How to cut images in Photoshop
Cutting images in Photoshop can create unique and interesting artwork. One way that you cut images in photoshop is to use the Rectangular marquee tool. Before you can cut the image you will have to right-click the text in the layers panel and choose Rasterize layer. Use the Rectangular marquee tool to select a part of the image. This allows you to make changes to that selected part without affecting the rest of the image. with the selection around the part of the image that you want, go to Edit then choose Cut. You then create a new layer, then on the new layer go to Edit then Paste. This will paste the other part of the image on a new layer. Adjust both pieces to show the space. You can move the pieces so that they are directly aligned or make them slightly off.
What tool can be used to cut images into slices for web?
The Slice tool is used to cut images into slices in Photoshop for use on the web. The slice tool cut and arranges the slices into a table form then the slices are saved for the web with the HTML code so that the image can be laced on your website.