How to show or hide Picture Placeholders in Word
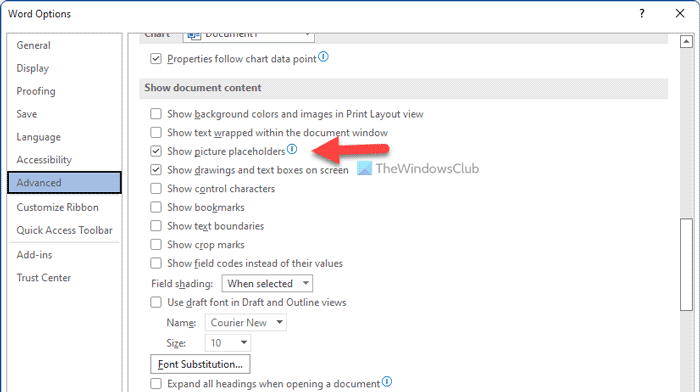
To show or hide picture placeholders in Microsoft Word, follow these steps: To know more about the process, keep reading. To get started, you need to open Microsoft Word on your PC. Then, click on the Options menu visible in the bottom-left corner to open the Word Options panel. Following that, switch to the Advanced tab and head to the Show document content section.
Here you can find a setting called Show picture placeholders. If you want to show the picture placeholders, you need to tick this checkbox. Otherwise, if you want to hide the picture placeholders, you need to remove the tick from the checkbox and click the OK button.
Show or hide Picture Placeholders in Word using Group Policy
To show or hide Picture Placeholders in Word using Group Policy, follow these steps: Let’s learn more about these steps. Note: In order to use the Group Policy method, you need to download the Administrative templates for Office 365. First, search for gpedit or gpedit.msc in the Taskbar search box and click on the individual search result to open the Local Group Policy Editor on your computer. Then, navigate to this path: Double-click on the Show picture placeholders setting. Choose the Enabled option to show the picture placeholders and the Disabled option to hide the picture placeholders in Word.
Finally, click on the OK button to save the change and restart Microsoft Word.
Enable or disable Picture Placeholders in Word using Registry
To enable or disable Picture Placeholders in Word using Registry, follow these steps: To learn more about these steps, continue reading. First, press Win+R > type regedit > press the Enter button and click on the Yes option in the UAC prompt to open the Registry Editor on your PC. Then, go to this path: Right-click on 16.0 > New > Key and name it as word.
Then, repeat the same steps to create a sub-key inside the word key and name it as options. Following that, you need to create a REG_DWORD value. For that, right-click on the options key, select New > DWORD (32-bit) Value and name it as showpictureplaceholders. By default, it has a Value data of 0. If you want to disable the picture placeholders, you need to keep that Value data. However, if you want to show the picture placeholders in Word, you need to double-click on it and set the Value data as 1.
Click the OK button to save the change and restart your computer to get the change. Note: In most cases, you might not find the office or 16.0 keys inside the Microsoft key. If so, you need to create them manually. For that, right-click on Microsoft > New > Key and name it as office. After that, do the same to create a sub-key under office and name it 16.0. Read: Stop users from changing default organization Office theme
Where is Show picture placeholders in Word?
The Picture placeholders option in Word is placed in the Advanced tab. In order to find this setting, you need to open Word and click on the Options. Then, switch to the Advanced tab in the Word Options panel. Following that, go to the Show document content section to find this setting.
How do I remove the placeholder from a picture in Word?
To remove the placeholder from a picture in Word, you can follow the aforementioned steps. There are three ways to add or remove the picture placeholder in Word. In the Local Group Policy Editor, you can open the Show picture placeholders setting and choose the Disabled option.