Share Files & Folders over a Network in Windows 11/10
To share files and folders over a Network in Windows 11/10, you can follow any one of these methods: Make sure to keep a tab on files you share, and with whom you are sharing it.
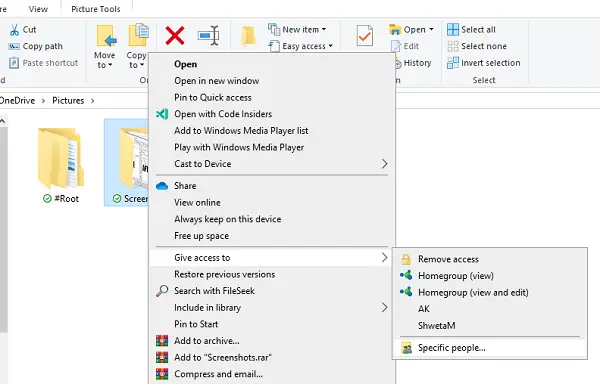
1] Right-click and share any file or folder
Right-click on any folder or fileHover your mouse over Give access toYou can instantly choose HomeGroup, users listed there or click on Specific people. I would suggest selecting the last one.It will open the Network Access window where you can select a user and assign permissionClick on the drop-down, and select a user. You can also click on Create new user if you have such requirementOnce you add a user, the default permission is Read. You can change it to WriteIf you added the user by mistake, you could click on remove option
Once done, ask the user to go their network, and check if the folder is listed. When they click on it, they should be able to access it. The process which we see here, where we assigned users and added them, it remains the same for the rest of the methods below.
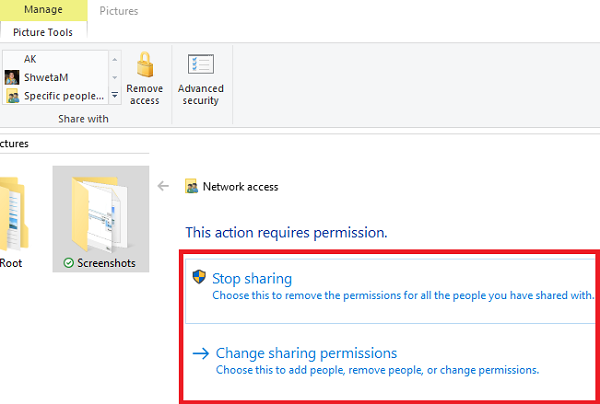
2] Use the Share Tab in File Explorer
Open File ExplorerNavigate to the folder or file you want to share, and select it.On the Ribbon menu, switch to ShareHere you have one-click option to Remove Access, i.e., stop sharing, and also a list of users with whom you can share the files.When you click on Specific people option, it will open the Network Access window which we saw in the above method.
When you click on Remove Access, you will have two options:
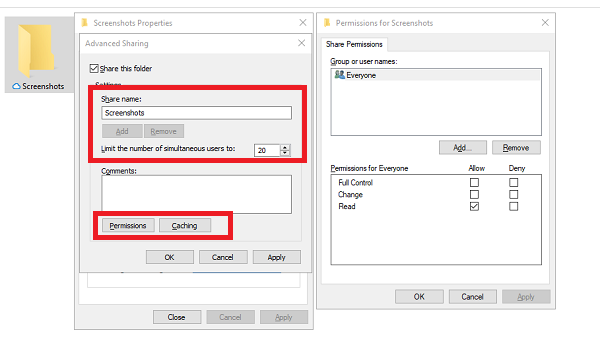
3] Sharing Properties of File and Folders
Right-click on file or folder, and click on PropertiesSwitch to Sharing tab. Here you have two options—Share and Advanced Sharing. The later will be dealt with in the next part.This tab displays if the folder has been shared earlier or not.Click on the Share button, and it will open the Network Access window, and you know the rest.
4] Advanced Sharing
Advanced sharing offers a lot of options.
Set a name which is different than the actual folder nameSet number of simultaneous accessAdd a commentPermissions and Caching
Let’s talk about how you can customize it.
Permissions for Shared Folder
Click on the Permissions button, and it will reveal the list of users who already have access to the folder. Here you can choose to Add, Remove, and assign Full control, change, or read permissions. You can choose to allow them or deny them.
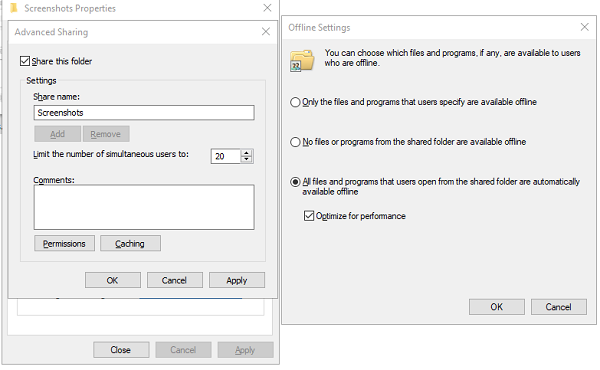
Caching Files and Folder
If you want to make sure the files are available even when the computer is offline, then you need to set up caching. Click on Caching, and you have three options
Only the file and programs which users choose to be available offlineNone of them is available offlineAll are available offline as soon as they access it. You can choose to optimize for performance.
Remember caching is when you want the files to be available offline. If you do not want that, configure it accordingly.
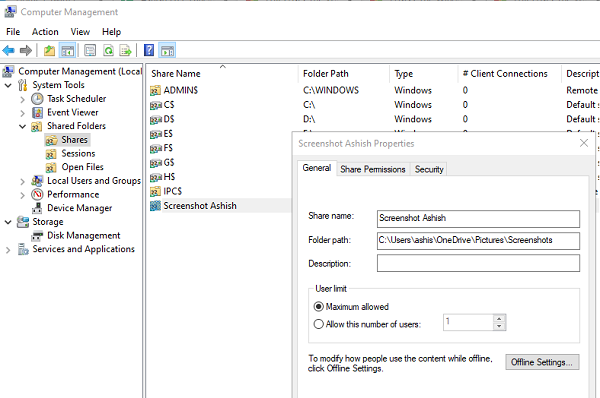
5] Manage all shared folders using Compmgmt.msc (Computer Management)
Now that you have shared folders, how do you keep track of it? One of the popular methods is going to your Network section, and find those folders; the other way is using Compmgmt.msc (Computer Management). It will allow you to manage all files and folders centrally. However, you will need admin privileges. It also allows you to find all the shared folders by other users as well. Type compmgmt.msc in the Run prompt, and open the Computer Management. Here you get access to System tools which also includes Shared Folders, Disk Management, Services, and WMI control. Click on Shared Folders. You have three options here — Shares, Sessions, and Open Files. Click on Shares.
It will list down all the folders which are shared from this computer. It will only display the share name, and not the real name if it’s configured. To change anything, double click to open the Shared folder, and make changes accordingly. The other two options give you access to find real-time sharing usage. You can view how many users are accessing share folders, how many files are open through the network, and so on.
That said, this option is not available to everyone; so here is how you can manage all shared folders.
Open File Explorer, and go to Network<Computer Name>Here you can see all the folders, and you can also manage them with a right-click > Properties > Sharing.
We hope the tutorial was easy to follow, and you were able to clearly understand to share Files and Folders over a Network in Windows 11/10. Read: How to stop Sharing a Folder in Windows 11/10.