Prevent users from deleting Printers in Windows 11/10
Using Registry Editor
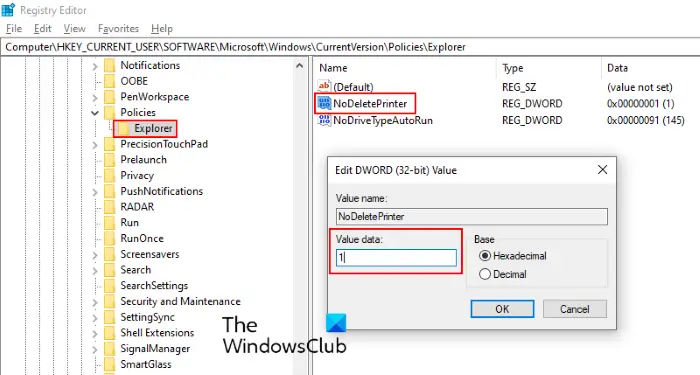
The method which we will show you to disable the Remove Device option is by using the Registry Editor. To use regedit, you must sign in to Windows computer as an administrator. Please follow all the instructions carefully while editing the Registry Editor, as any mistake can cause damage to your computer. Before you proceed, it is advised to create a backup of Windows registry on your hard drive so that you can restore the registry if any problem occurs. Follow the below-listed steps: Press Windows + R keys to launch the Run dialog box. Type regedit and click OK. Click Yes in the UAC (User Account Control) window. Copy the following path, paste it into the address bar of the Registry Editor, and press Enter. If you want, you can also go to the path manually. Now, you have to create a new value in the Explorer subkey. To do so, select the Explorer key, right-click on the right side of the interface, and go to “New > DWORD (32-bit) Value.” Name the newly created value as NoDeletePrinter. Double click on NoDeletePrinter and set its value to 1. Close the Registry Editor.
Using Group Policy Editor
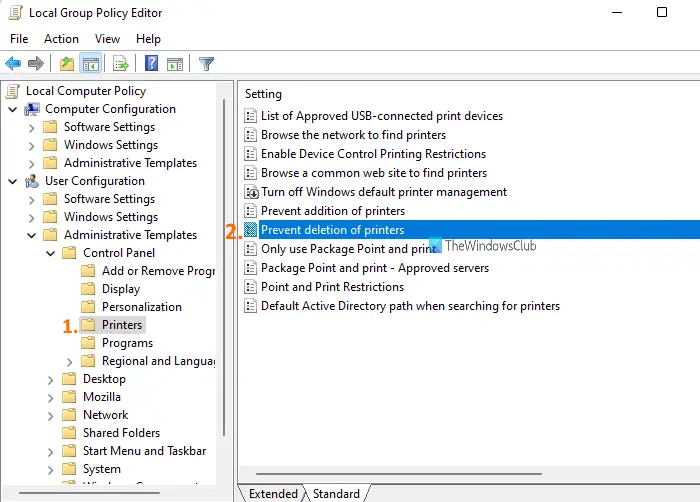
Group Policy Editor feature is already present in Enterprise and Pro editions of Windows 11/10. If you are using its Home edition, first add Group Policy Editor to Windows 11/10 Home edition, and then only you will be able to use this option. Once you have done it, follow these steps: Let’s check all the steps in detail. In the very first step, you need to open Group Policy Editor (or GPO) window. Use the Search box, type gpedit, and press Enter key to open it. You can also use PowerShell, Windows 11/10 Setting app, and other ways to open Group Policy Editor. When the Group Policy Editor window is opened, access the Printers folder using the following path: User Configuration > Administrative Templates > Control Panel > Printers
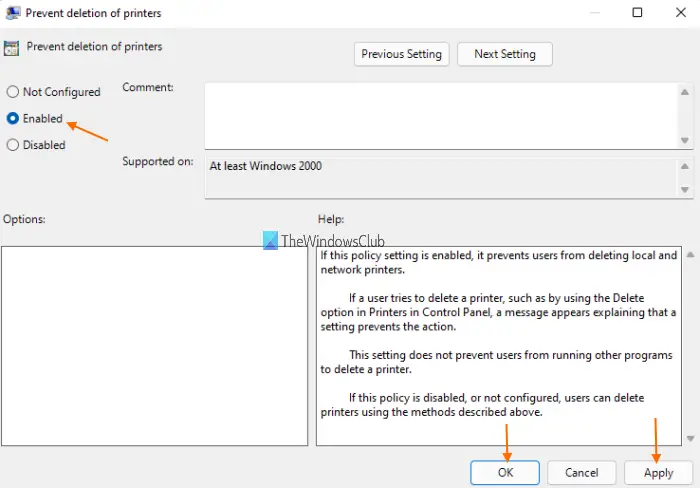
On the right-hand section, you will see a Prevent deletion of printers setting. Open that setting by double-clicking on it. That setting will open in a new window. There, you have to select the Enabled option.
On the bottom right part of that window, click on Apply and OK buttons. After that, close the Group Policy Editor window. Now users will not be able to delete your network and local printers. The Remove button for each printer from the Settings app of Windows 11/10 will vanish. Also, when will you right-click on a printer by accessing the Devices and Printers section, the Remove device option will still be there, but when you will click on it, an error or restriction message will be visible. Later, if you want to allow users to delete added printers, then follow the steps that are covered above and open Prevent deletion of printers setting. After that, select the Not Configured option in the setting window, and use Apply and OK buttons. Now you and other users will be able to delete any of the local and network printers. Now, no user can remove or delete the printers installed on your computer.
If any person clicks on the Remove device button, he will see the following message on the screen: If you want to revert the changes, set the value of NoDeletePrinter to 0 and restart your computer. If it does not work, delete the key that you have created.
Does removing a printer remove the driver?
The answer is a ‘No’. In Windows 11/10, you can easily remove a printer. However, the printer drivers remain stored in your device memory. It is handy when you have to quickly install a printer again. However, if you don’t want to use a printer ever again, then you should also remove its drivers. There are various ways using which you can completely remove a printer from your Windows 11/10 computer. For example, you can use the Printer Server properties of a printer, and then remove all the drivers and driver package or you can use Command Prompt window and then execute the command associated to remove a particular printer.
How do I change printer settings in Windows?
For each printer installed on your Windows 11/10 computer, you can set different settings. For example, you will be able to set:
Page orientation (Portrait or Landscape)Paper sizePrint qualityPrint in grayscale or take a colored printPaper sourceBordersPages per sheet, and more.
For this, you need to open the Printer Preferences window to change the Printer settings of a particular printer. Just open the Settings app of Windows 11/10, access the Printers & Scanners Settings page, and there you will see the list of available printers. For each printer, an option to open the Printer preferences option will be there. Use that option and then you can set printer settings as per your requirements. Let us know if you have any questions. Related posts:
Fix Printer is in Error StatePrint to PDF not working.