For example, the Most Recently Used (MRU) list of fonts displayed in the drop-down menu, appears as shown above. This is shown when you just select text in your Word while editing.
Hide Most Recently Used Fonts list in Word
Making mistakes while editing the Windows Registry could affect your system adversely. So be careful while editing registry entries and create a System Restore point before proceeding.
Press Windows Key + R combination, type put regedit in Run dialog box and hit Enter to open the Registry Editor.
In the left pane of Registry Editor, navigate here:
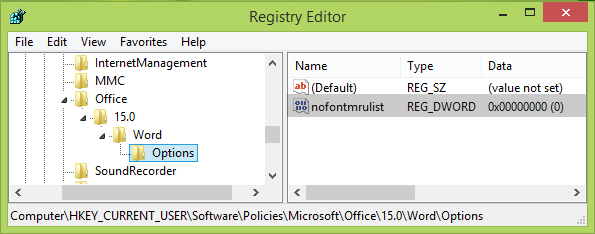
In the left pane of the above-mentioned location, right-click Microsoft key and select New > Key. Name the newly created key as Office. Similarly, create sub-key 15.0 to Office key. Again create sub-key to 15.0 and name it Word. Finally, create sub-key to Excel and name it as Options.
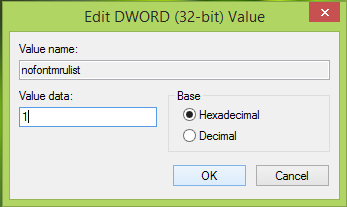
Highlight Options and come to its right-pane such that registry location becomes: Right-click in the blank space, select New -> DWORD Value and name the registry DWORD as nofontmrulist. Double click this newly created DWORD and give it a value 1 to disable MRU list in font dropdown. Click OK.
Close Registry Editor and reboot to make changes effective. After restarting the system, you’ll find that MRU list font dropdown is hidden already.
How do I get rid of recently used fonts in Word?
To get rid of recently used fonts in Word, you can take the help of the Registry Editor. For that, open the Registry Editor on your computer and navigate to HKEY_CURRENT_USER\Software\Policies\Microsoft. Then, create keys named Office > 16.0 > Word > Word > Options. Then, create a DWORD(32-bit) Value named nofontmrulist and set the Value data as 1.
How do I see all fonts in Word?
To see all fonts in Word, you can expand the Fonts panel included in the Word. It is available in the Home tab, and you can find the exact drop-down list in the Font section. Whether you want to see all fonts in Word, Excel, or PowerPoint, the process is the same. That’s all! Hope it helped.

