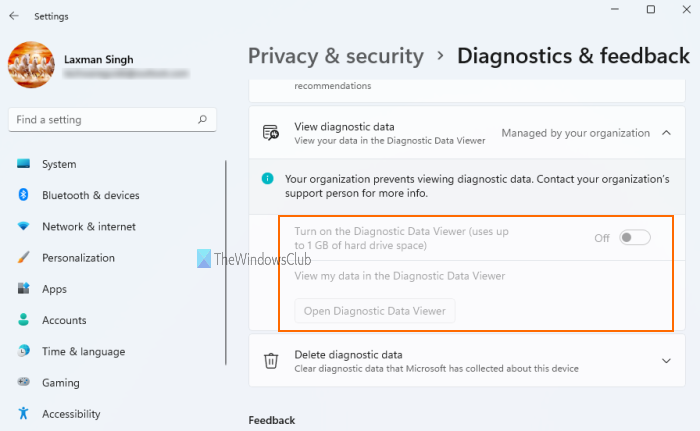
Once you have disabled it, the buttons to Turn on the Diagnostic Data Viewer and Open Diagnostic Data Viewer will be greyed out, as highlighted in the screenshot above. That simply means that users won’t be able to launch Diagnostic Data Viewer from Diagnostics & feedback Settings page. Do not worry, you can also turn on or enable this feature whenever you want.
Disable Diagnostic Data Viewer in Windows 11
There are three ways using which you can disable Diagnostic Data Viewer on your Windows 11 computer. These are: The Settings app option is pretty simple. But, before you try Group Policy Editor or Registry Editor option, you should create a system restore point. This will help you restore your Windows 11 computer to an earlier state in case something wrong happens. Now let’s check all these options one by one.
1] Using Settings app
Here are the steps: To enable or turn on Diagnostic Data Viewer again, follow the above steps, and use the Turn on the Diagnostic Data Viewer button.
2] Using Group Policy Editor
Follow these steps: Let’s check these steps in detail. In the first step, open Group Policy Editor. For that, open the Run Command box (Win+R), type gpedit.msc, and use the OK button. When the Group Policy Editor window is opened, access Data Collection and Preview Builds folder. The path to access that folder is:
On the right-hand section of this folder, double-click on Disable diagnostic data viewer setting to open it. That setting will open in a new window. There, select the Enabled option. Finally, press the Apply button, and then the OK button.
This will completely disable Diagnostic Data Viewer on Diagnostics & feedback Settings page. To enable Diagnostic Data Viewer again, just follow the steps mentioned above, use the Not Configured option in the last step, and press Apply and OK buttons.
3] Using Registry Editor
The steps to disable Diagnostic Data Viewer using Windows Registry are: Click on Windows 11 Search box, type regedit, and hit the Enter key to open the Registry Editor window. Or else, you can use other ways to launch Registry Editor window. Now access the DataCollection Registry key. The path to access this key is:
If this key is not present for some reason, then create a new Registry key, and then rename it with the DataCollection name. On the right-hand section of the DataCollection key, create a DisableDiagnosticDataViewer value. To create it, right-click, go to New, and click on DWORD (32-bit) Value. After creating that new value, rename it as DisableDiagnosticDataViewer.
Double-click on that value and a small box will pop up. There, put 1 in its Value data field. Finally, press the OK button to save the changes.
To enable Diagnostic Data Viewer again, you can follow the above steps, and then delete the DisableDiagnosticDataViewer DWORD value. This will undo all the changes.
How do I turn off Windows Diagnostic Data?
If you are using Windows 11 computer and want to turn off Diagnostic Data Viewer, then it is pretty simple to do that. You have to access the Diagnostics & feedback page available under the Settings app of Windows 11. Under that page, there is a button to turn it off/on. In this post above, we have also covered step-by-step instructions to turn off Diagnostic Data Viewer.
Should I delete Diagnostic Data in Windows?
As part of using Windows, Microsoft collects a limited set of data (known as required diagnostic data) from your device to keep your device up to date, secure, etc. Apart from that, optional diagnostic data (if turned on) is also sent from your device to Microsoft. While some users are OK with that, others are more cautious about their privacy. If this is the case, then yes, you should delete Diagnostic Data from your Windows computer. Thankfully, Microsoft provides a built-in feature in Windows 11 to do that. You need to: After that, Microsoft will start deleting your data copies from its systems. Hope this helps.

