Most of us are familiar with a software called VMware, which helps users install almost any other operating system virtually. All you need is just a computer with enabled Intel Virtualization and the ISO of that OS. However, what if you want to transfer files from your virtual OS to the actual OS? There are a few ways to transfer files such as you can use a pen drive or an external hard disk and much more. Now, what if you want to transfer files from your virtual OS to your real or actual OS? There are a few ways to transfer files – like you can use a pen drive or external hard disk, etc. In this guide, we will show how users can create Shared folder for the installed OS in VMware and, consequently, share their computer’s files with a virtual machine.
Create shared folder for installed OS in VMware
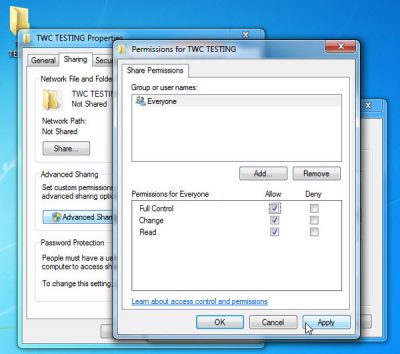
If you create a shared folder in your virtual computer, you can transfer files from the virtual OS to the actual computer OS without using any device. Moreover, there would not be any limit on the file size; and the transmit speed would be fast too. Plus the best part is you do not need any third-party software since Windows allows users to create a shared folder and share files over a connected network. For your information, the following guide is mainly for Windows users. However, it is possible to create a shared folder on almost all operating systems, and hence, it is possible to share a file with shared folders in VMware. The very first thing you need to do is to turn on Network Discovery if it is disabled for your current network. Following that, you need to create a shared folder on both OS i.e. virtual computer as well as the original machine. Create a folder anywhere, right-click on it and select Properties and then open the Sharing tab. Next, click on Advanced Sharing and select the checkbox labeled Share this folder. Now click on Permissions and select the Full Control checkbox (Allow) and save all the changes by clicking on Apply and OK. Do the same in both OS.
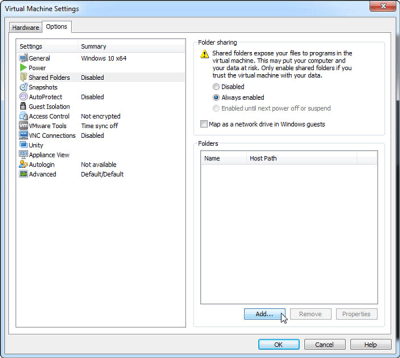
Now open VMware and right-click on the OS where you have created the shared folder. Click on Settings and go to Options tab. Here you can find Shared Folder option. Click on it and select Always enabled. Next, click on Add button and select the shared folder that you have created in the original OS. Don’t forget to save all the changes.
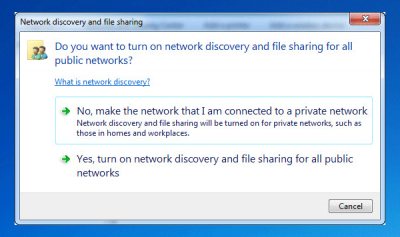
Now turn on the virtual OS and open File Manager. Here you should see Network on the left sidebar. If you haven’t enabled Network Discovery and File Sharing yet, you will get a notification. Click on it and turn it On. Do select No, make the network that I am connected to a private network. You have to do the same on both OS.
After that, you should see the PC name on your screen. Double-click on the PC name and find out the Shared folder. This step is just for testing whether you have done everything correctly or not. Now, whenever you place any file in that shared folder in one OS, that file will be visible in the other OS in that shared folder. Hope you find this little guide helpful.
How to enable Copy and Paste in VMware?
In order to enable copy-paste in VMware virtual machines, you must create a shared folder. No matter whether you want to copy or transfer files from host computer to virtual machine or vice versa, you need to create a shared folder and enable network discovery on both. As virtual machines do not allow users to cut or copy files between host computers or virtual machines, creating the shared folder is the only option. However, if you do not want to do that, using email, cloud storage, and USB drive are the options you might use.