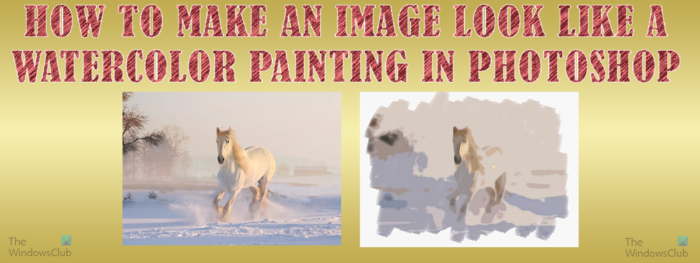
How to convert Photo to Watercolor Painting in PhotoShop
Making any image look like a watercolor painting is quite easy to follow and will be even easier to do alone after going through it a few times. Whenever you are working in Photoshop, try to observe and remember how each change you make looks. This will help you to know how to do other effects and what tools and layer styles to use to achieve a certain look. This watercolor effect can be used on any image and can then be printed on many items. The watercolor paint effect can be achieved in many ways but this article will show one of the simplest, easy-to-remember steps.
1] Open image in Photoshop
Open Photoshop then go to File then Open and search for the image or images that you want to make look like watercolor paint. When you find the file click on it and then click Open. You can also find the file then right-click on it and click Open with Photoshop. Ideally, you should put these images into one folder where you will save the Adobe PSD file. I said images because the last step will be how to make images watercolor in a few quick steps without going over all the steps.
2] Download or create watercolor paper
Watercolor paint is done on paper or canvas and the material gives the painting a unique look. The watercolor paper makes the painting have lines in it. The paper or canvas comes in different textures so you can choose the texture that suits you. To get the full watercolor look on the computer, you will need to make the image look like it was created on paper or canvas. You can download the watercolor paper online and place it above the image in Photoshop. To create your own watercolor paper effect, go to Photoshop and open a new file that is the same size as the images that will be made to look like watercolor. Change the background to a layer by double-clicking on the Background, you will be asked to name the layer then press OK. You can name the layer watercolor paper. Right-click on the layer and choose the Blending options then click on the word Texture. You will see Patterns click the down arrow and you will see the patterns that you can choose from. You can choose the Gray granite pattern then move the scale to the left so that the grains are smaller. This will make them look more like grains on watercolor paper or canvas. If you need more patterns, click the down arrow then, click the gear icon and choose the pattern group you want. You will be asked if you want to replace current patterns. You can click Ok to replace or Append to just add the new patterns to what is already there. This same document that is used to create the watercolor paper can be the same document used to make the image look like a watercolor painting. Just be sure to keep the watercolor paper on top of the image layer If you had downloaded the watercolor paper, put it in Photoshop, and make sure that it is above the image layer.
3] Duplicate image
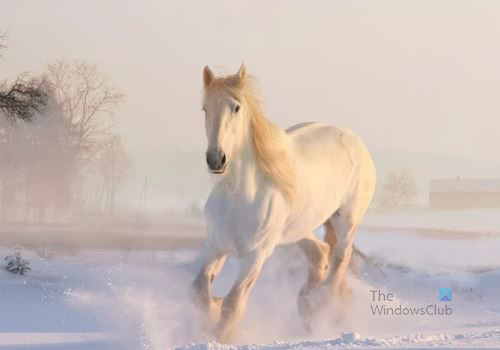
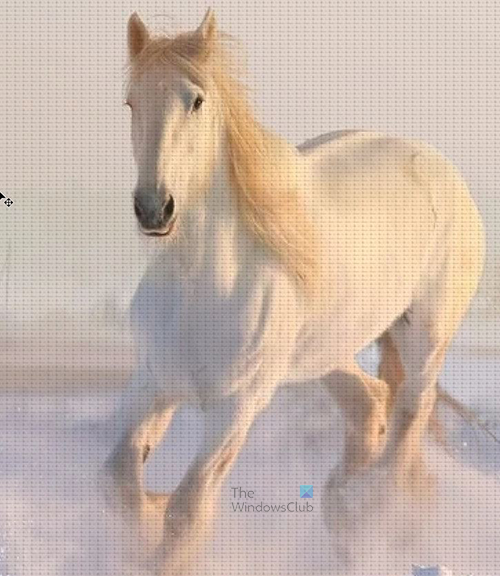
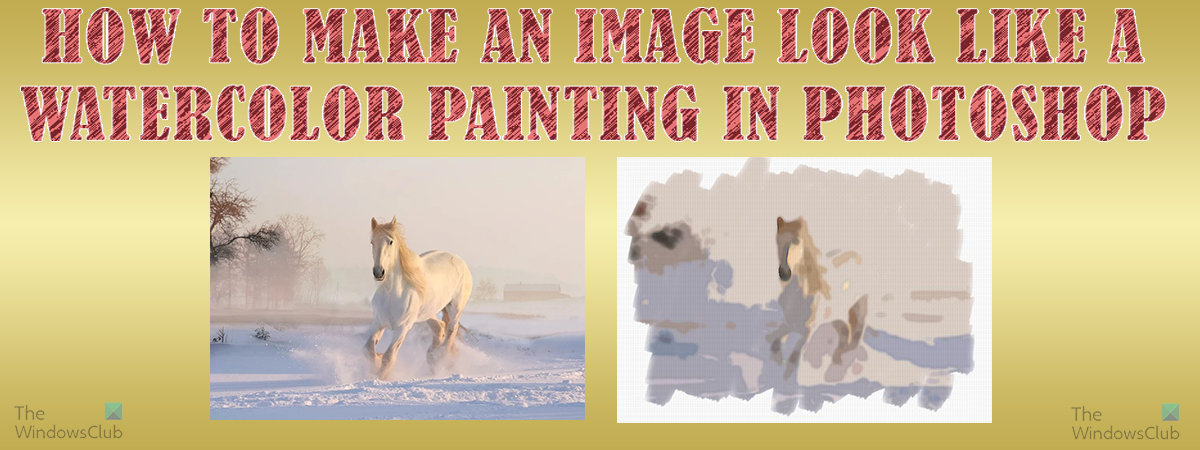
The image that will be used is the photo of a white horse.
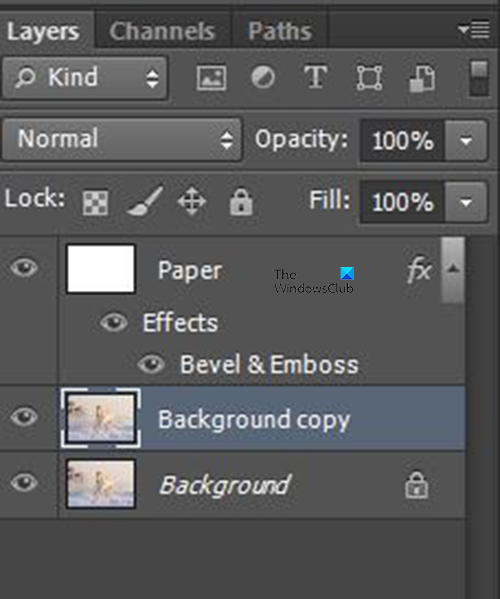
You will see that when the image is opened it is opened as a background and is locked. You can choose to duplicate the layer to keep the original protected. You can duplicate the image by right-clicking the image and pressing Duplicate Layer, or by going to the top menu bar and going to Layer then Duplicate Layer, give the layer a name, and press OK. You can also duplicate the layer by going to the Layers panel and dragging the layer down to the Create a new layer icon then releasing it. Dragging the layer down to the Create a new layer icon will duplicate the layer and it will be named Background copy. You can also create a new layer by pressing Ctrl + J on the keyboard. Pressing Ctrl + J will duplicate the layer and it will be named Layer 1 automatically.
4] Change paper color mode
The paper and the image that will be made to look like a watercolor painting are placed in photoshop. The image will be called background when it is just opened in Photoshop and it will be below the paper layer. Be sure that the paper layer is at the top of all the layers.
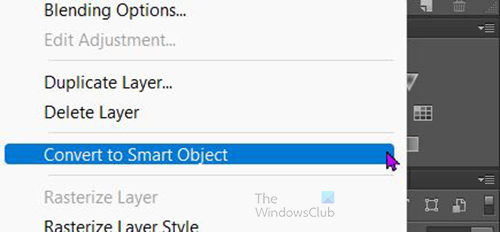
Before making any changes to the paper layer you should change it to a Smart object. To change it to a smart object, right-click on the paper layer and choose Convert to smart object. In order to give the image the look of being painted on paper or canvas, change the paper layer’s color mode to Multiply.
When the paper’s color mode is changed to Multiply, you will notice that the image below starts to show through and the image has a paper grain look.
5] Change image name and change to smart object
Before making changes to the image which in this case is the background, you can change the name. to change the name double click on the background copy and give it a name. I will name it Horse.
Right-click on the horse layer and choose Convert to smart object.
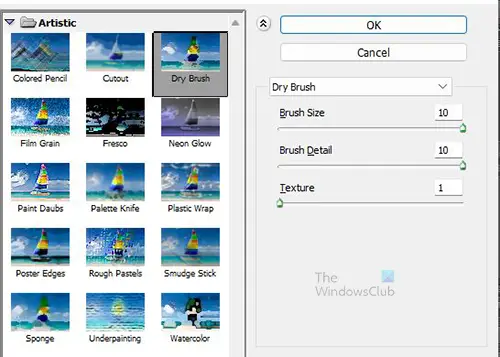
6] Add Dry brush filter
With the horse layer still selected, go to the top menu bar and choose Filter then Filter gallery. In the filter gallery choose Dry brush. When you choose Dry brush you will see three sliders under each under a heading namely; Brush size, Brush detail, and Texture. Make the value of the Brush size 10, the Brush detail 10 and the Texture 1. You can make each of the values 0 and then move the sliders slowly to the right and see the effect. You can also click in each of the value boxes and use the up and down arrows on the keyboard to move the values up or down and observe the changes, depending on the image the look may be different so choose the value that best fits your image and preference.
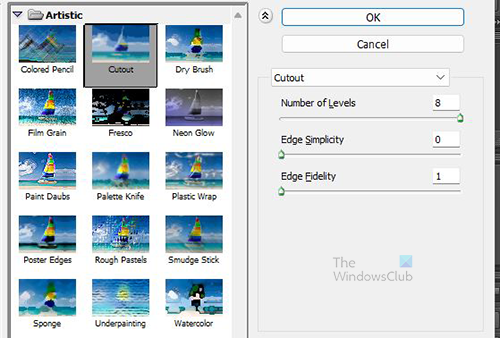
7] Add Cutout filter
The next filter to add is the Cutout filter. Go to the top menu and click on Filter then Filter Gallery and choose Cutout. You will notice three sliders under headings; Number of levels, Edge simplicity, and Edge fidelity. For the Number of levels make the value 8, for Edge simplicity make the value 0, and for Edge fidelity make the value 1. Remember to observe the changes and make the values whatever fits your image and preference.
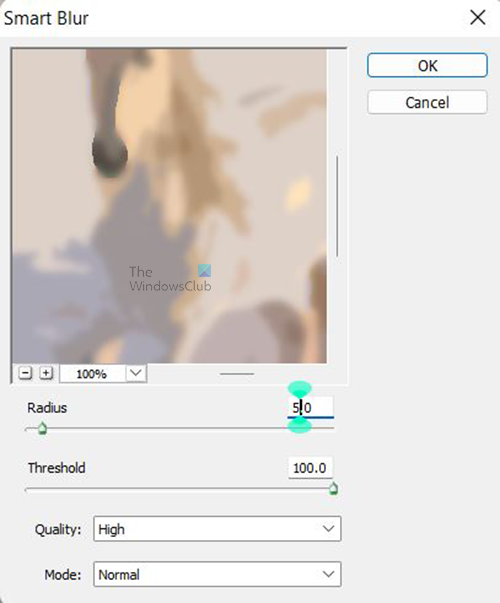
8] Add Smart blur
The next step is to add Smart blur. Go to the top menu bar and choose Filter then Blur then Smart blur. There are four settings that need to be changed. Radius, Threshold, Quality, and Mode. Make the Radius value 5.0, the Threshold 100.0, the Quality High, and the Mode Normal.
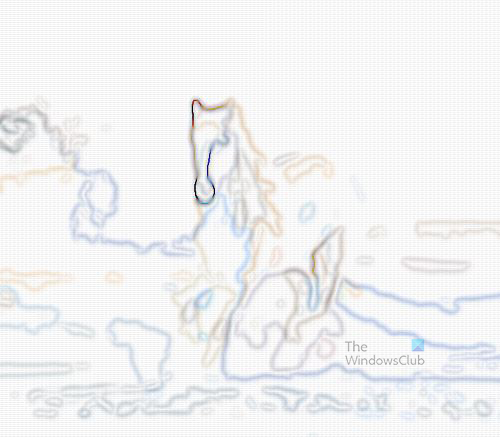
9] Find edges
The next step is to use the Find edges filter. Go to Filter then Stylize then Find edges. This is the image with the Find edges filter added. See how it looks like it is melting. Don’t worry it will soon look like it is supposed to. Just keep following the steps to the end.
10] Edit Filters
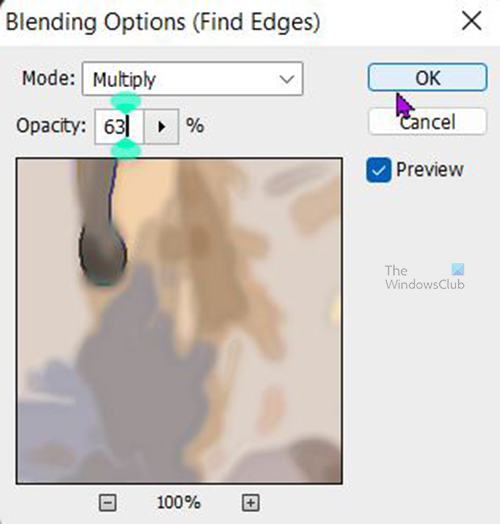
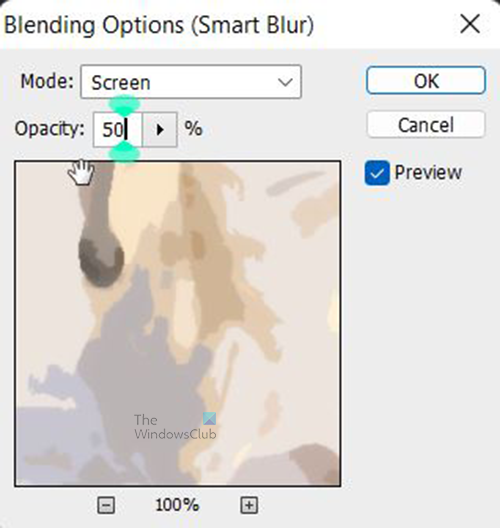
This is the time to make the image look even more like a watercolor painting. Two filters need to be adjusted to make this possible. Go to the Layers panel and look for the filters listed under the Smart filters layer. Each of the filters has a settings icon to the right of it. Double-click on the setting icon beside the filter that you want to edit. In this case, the Find edge and the Smart blur filters will be edited.
Double click on the Find edge filter settings button and a window will appear with options to set. Set the Mode to Multiply and the Opacity to 63.
Double click on the Smart blur filter settings button and a window will appear with options to set. Set the Mode to Screen and the Opacity to 50%.
11] Add Layer mask
This step is where the Layer mask will be added, this is important because the Brush tool will be used, the layer mask will hide the image and the brush will be used to reveal the parts that you want to show. This will help to create the watercolor painting effect. To add the layer mask, make sure that the main image (horse) is selected. Go to the bottom of the Layers panel and click the icon with the white square and the hole in the middle. That is the Add layer mask icon. You will notice a white rectangle appear beside the image layer, that is the layer mask. You will need to make the mask hide the image, so you will need to invert it. To invert the layer mask press Ctrl + I, and the layer mask will turn black. The image should get hidden behind the layer mask, however, if this is not the case, you will have to make the Background image invisible by clicking on the Eye icon on the left of it.
12] Reveal the image using a watercolor brush
To get the brush effects and make the image look more like a watercolor painting. You have to use a watercolor brush. You can download a watercolor brush from a trusted source online or look for one in Photoshop. If you do not want to download a brush and a watercolor brush is not available in Photoshop, you can use a regular brush and use it as best as possible to make the image look like a watercolor painting. Select the Brush tool from the left tools panel. Right-click on the canvas and you will see the brush window. scroll down and look for the watercolor brushes, click on it. Make sure that the foreground color is white and then start brushing. Use the brush to keep revealing the image bit by bit. Do not reveal all of the image but leave parts hidden to give it the watercolor painting look.
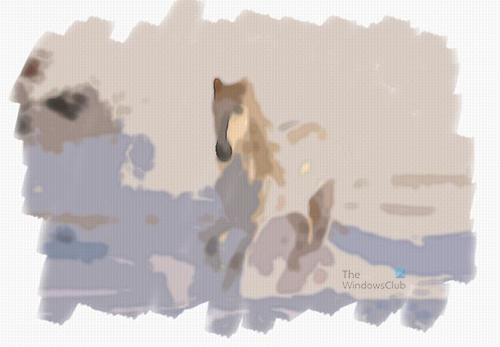
Here is the final result and the image is looking like a watercolor painting.
Bonus tip
Here is a bonus tip that will be extremely useful. You may want to make other pictures look like watercolor painting. You may not want to go through all the steps that are required to make the image look like a watercolor painting. There is an easy way to do this, it is so easy it will take a few seconds.
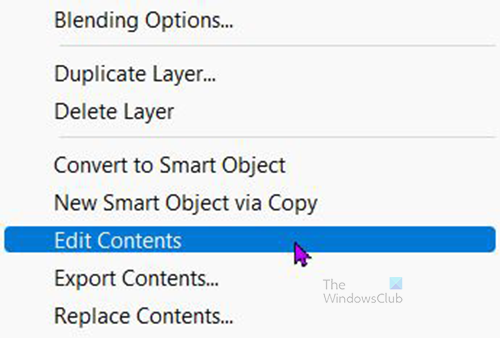
Go to the Layers panel and right-click on the main image, the horse image, in this case, click Edit content.
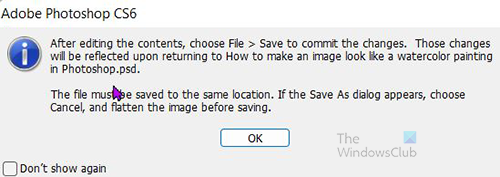
A prompt will appear with instructions, click Ok to continue. A new tab will appear and a new Photoshop window will appear with the image that was changed to look like a watercolor.
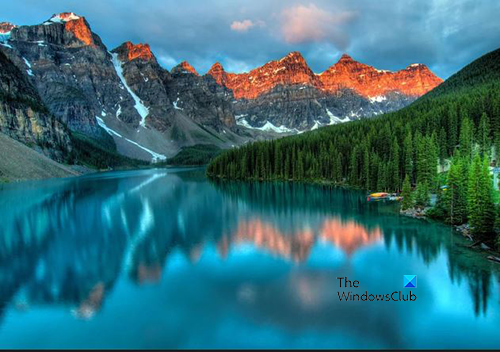
You will need to place the new image that you want to change over that image. Go to File then click Place and select the new image. Fit the new image over the old image to completely hide it.
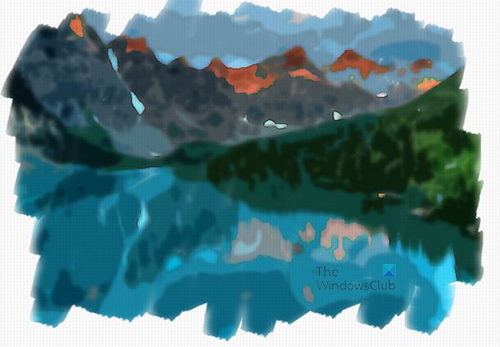
When you have finished adjusting the new image over the old image press Ctrl + S. You can then click on the tab to go back to the first document. You will see it updated with the new picture and it will look like a watercolor painting. This quick and easy step can be used as many times as you wish. Be sure to save the first document created as an editable Photoshop PSD file. You may need to edit the filters to fit the new images; Note: Save the first document properly as a Photoshop PSD file so that edits can be made later. Save the new update as a different name to protect the first document from accidental edits. You will need to keep the first document editable so that you can use it to make other watercolor paintings. Read: Photoshop Tips and Tricks for Beginners
Can Photoshop turn a photo into a painting?
Photoshop can make an image look like a painting. Using a combination of the tools, layer effects, and filters you can make an image look like it was painted. This article is one of the ways that images can be made to look like a painting.
How do I change a picture to look like a watercolor?
I hope you find the post useful.