Now, as we’ve stated before, GIMP is powerful, which means, it is not hard to convert images to black and white. Today we will look at the best three ways to convert colored photos to black and white. Each solution differs from the other, as expected, but most importantly, they work.
How to convert Images to Black and White on GIMP
If you want to convert color Images to Black and White on GIMP, then please follow one of these methods:
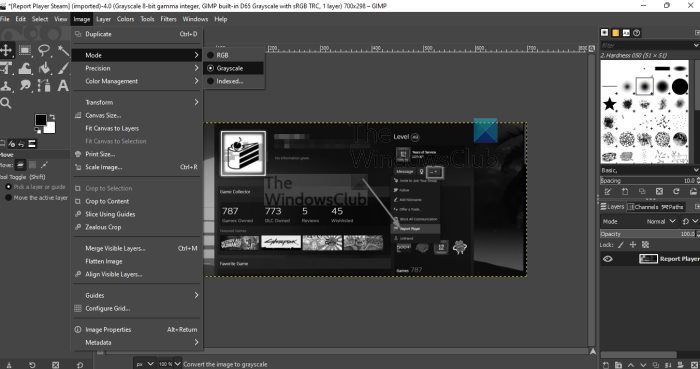
1] Use Grayscale mode to turn images into black and white
One of the easiest ways to transform your colored photos to black and white is to enable grayscale mode. By default, images added will open in RGB mode, but the option is there to change it to grayscale, so let us talk a little bit about how to accomplish that.
Open the GIMP app.From there, press File tab.Use the option from the dropdown menu to add a photo.Once the colored image is added, please click on the Image tab.After that, you must select Mode from the dropdown.You should now see three options.They are RGB, Grayscale, and Indexed.From that small list, choose Grayscale.
Right away your photo should be converted to black and white. You can now save it to your computer if you’re pleased with the outcome.
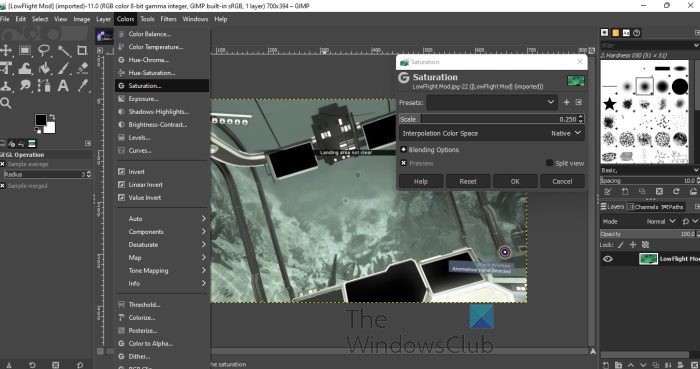
2] Make use of the Desaturation feature
You’ll notice that when grayscale is used to add black and white to a picture, there aren’t many options to determine the intensity of the color. This is where desaturation comes into play because it comes packed with versatility.
To begin, please add the relevant image.From there, add a layer to the photo.Next, you must click on the Colors tab.From the dropdown menu, click on Saturation.A small window should now appear.Use the Scale feature to determine the intensity of the black and white shade.
If you want, you can use presets already saved, or save your own presets for future use. Whenever you want to access your saved presets, simply click on Colors > Desaturate, then Desaturate again. Choose the presets from the pop-up window, and that’s it.
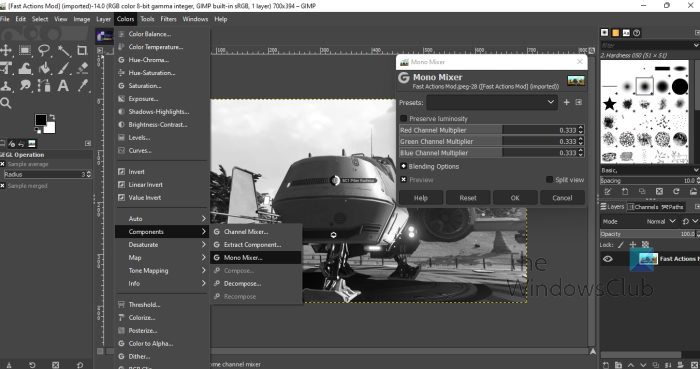
3] Adjust the image via the Mono Mixer
The final solution to transforming your colored photo to black and white is to use the Mono Mixer. This is a simple feature, one that is more flexible than the others we’ve mentioned here, and that is because it allows the user to customize almost every aspect of the image. Folks who want more control over what they’re doing must make use of the Mono Mixer, and we’re going to discuss how.
Open the image in GIMP.The next step, then, is to click on the Colors tab.A dropdown menu should now be visible.Go to Components and hover your mouse over it.From there, select Mono Mixer.Right away the image should turn into black and white.Also, a small window will open.
From this window, you will see several RGB channels that can be used to change the tone of the photo. If you want more control then we suggest taking advantage of Channel Mixer over Mono Mixer. READ: How to use the Enhance filters in GIMP
How do you convert colored image into black and white?
There are many options to convert a colored image into black and white on your computer. However, GIMP is one of the best and free options you can use to get the job done. Whether you have a portrait, landscape, HD, 4K, or any other image, you can convert it into black and white within moments. Although you can use the effect directly, it is not recommended to do that, and the exact correct process is mentioned in this article that we recommend you to follow.
How do I change the color of an image in GIMP?
Like, Photoshop, GIMP also comes with some options like RGB, Grayscale, Indexed, etc. You can find these options under Image > Mode. First, open the image in GIMP and navigate to that section as mentioned above. Next, choose a Mode as per your requirements.