How to add Neon Glow to Text in GIMP
Enter your Text into the canvas. We will turn the background black and the text white.
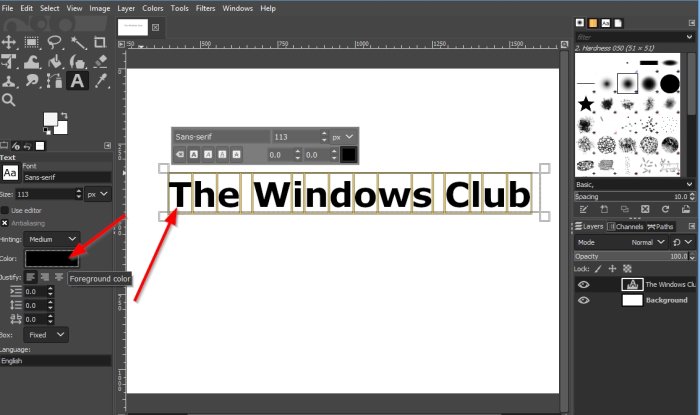
To turn the text in the textbox white, place the cursor in the box and drag it across the text to highlight. Then go to the left pane and click the Color button.
A Text Color dialog box will open. Choose a white color then OK.
We will click the Background layer on the right pane. Then click the Background Color button under the tools in the toolbox. A Change Background Color dialog box will appear. Choose a background color. We chose black.
Click Edit on the menu bar, and in the list, click Fill with BG color with a black icon. We are going to add an outline around the text.
Click on the text layer “ The Windows Club” and decrease the Opacity to two on the right pane.
Right-click the text layer “ The Windows Club.” From the list, select Alpha to Selection.
Click the button at the bottom called Create new layer and add it to the image.
A New Image dialog box will pop up; Name the Layer Outline, then click OK.
Then go to Edit and select Stroke Selection.
A Stroke Selection Dialog box will open. Inside the dialog box, make the Line Width Pixel 5. Then click Stroke.
Then click Select on the menu bar and click None. There will be an outline around the image.
Right-click the layer called Outline and select Add Layer Mask.
An Add Layer Mask dialog box will open. In the dialog box, we will choose Black (Full Transparency). Then click Add. You will notice that the outline is gone.
Now we will select the Paintbrush tool in the toolbox. When the Paintbrush tool is selected, features related to the Paintbrush tool will appear below to customize the paintbrush. You can increase the size by clicking the increase and decrease arrow key of the size box. Paint some parts of the letters of the text on the canvas, notice the edges of the text are outline.
Now we will turn off the visibility of the text by clicking the Eyeball beside the text “The Windows Club.” Now we will increase the size of the paintbrush and decrease the Opacity.
Click on the text in the canvas to add the highlight to the un-outline edges of the text; it is dimmer than the previous outline. Then right-click the layer named outline on the right pane and select Apply Layer Mask.
We will duplicate two copies of the Outline layer. To do this, click the Create a duplicate of the layer and add it to the image button twice.
Click the outline layer copy in the middle. Then we will click Filters on the menu bar and select Blur and choose Gaussian Blur.
A Gaussian Blur dialog box will appear. Change Size X and Size Y to 3. Then click OK.
Then go to the outline layer copy in the middle Opacity and make it 80 percent. Then We are going to click the other Outline layer copy and click Filters on the menu bar and select Blur and choose Gaussian Blur again. In the Gaussian Blur dialog box, change Size X and Size Y to 5. Then OK.
Now we will click the top outline copied layer and click Create a new layer and add it to the image button. The New Layer dialog box will appear, name the layer, then click OK. Then click the Paintbrush tool and make the size a little smaller click some parts of the text to highlight. Then click Mode on the right pane.
Then choose Soft Light from the list. We will create a new layer by clicking the Create a new layer and add it to the image button again. Then click OK.
Now we want to add some colors to the highlights. Click the Foreground Color button underneath the tools in the toolbox. A Change Foreground Color dialog box will appear. Choose a Foreground color. Make the size of the paintbrush bigger. In this tutorial, the paintbrush size is 587.00. Add the color to the text in the canvas. Click the Foreground color button again and choose another color from the dialog box and click OK.
Add the color on the text to blend with the other color.
Click Filter on the menu bar and click Blur, and select Gaussian Blur. In the Gaussian Blur dialog box, we will increase Size X and Size Y to 48.50. Then click OK. Click Mode on the right pane.
Then select HSL Color.
Now we have a Neon Glow on our text. We hope this tutorial helps you understand how to add a Neon Glow effect to text in GIMP.