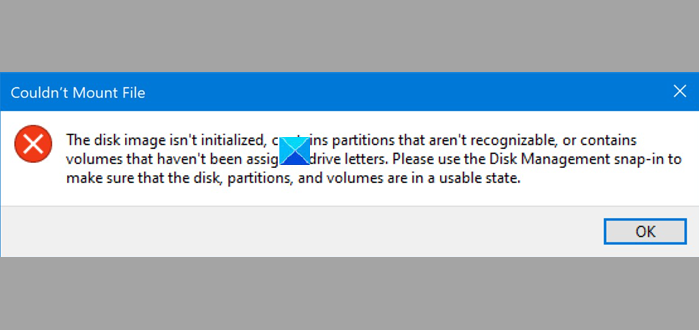
Couldn’t Mount File, The disk image isn’t initialized
For users that are not aware, Image back up is a VHD (Virtual Hard Disk) or VHDX (Hyper-V virtual hard disk file format) File. So, if you want to have access to the image backup file, you’ll need to mount it or attach it in Disk management. Press Win+X in combination and choose the Disk Management option. Next, when the Disk Management window opens, switch to the Action tab located in the upper-left corner and adjacent to the File tab.
From the Action menu, select the Attach VHD option. TIP: How to add Attach & Detach option to context menu of VHD files When a new window pops up on your computer screen, hit the Browse button to go to the file location.
Select the .vhd or .vhdx file you want to mount. Right-click and click on “Initialize Disk”. On the right side, you may see a shaded area called Unallocated. Right-click on it and select Create simple volume and complete the simple wizard. Now your VHD will be initialized. Double Click on your file, and the .vhd/.vhdx file will now be mounted and attached as a drive. You will see it open in a separate File Explorer window. When finished, proceed to restore the backup from the Repair Disc you created earlier or an external hard drive. Related errors:
Couldn’t Mount file, Sorry, there was a problem mounting the fileCouldn’t Mount File, The disk image is corrupted.