Change these default settings in Excel for better experience
Some of the default Microsoft Excel settings you should change are: To learn more about these settings, continue reading.
1] Change Body font and size
By default, Excel uses Calibri at 11px. However, if you have a high-resolution monitor, this setting could be a problem for you since it displays everything in a small panel. That is why you can change the body font and size as per your requirements with the help of this guide:
Open Excel Options panel.Make sure that you are in the General tab.Find the Use this as the default font section.Choose the font.Expand the Font size menu.Choose the font size.Click the OK button.
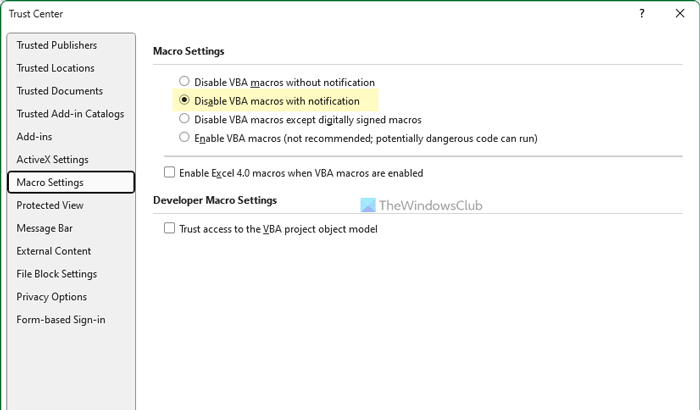
2] Disable VBA macros
Most times, attackers use Excel spreadsheets to spread malware or inject trojans into your computer. Although there are many ways to do that, macros are the most common thing they use. That is why you should keep this enabled all the time. Follow these steps to disable VBA macros:
Open Excel Options on your computer.Switch to the Trust Center tab.Click on the Trust Center Settings button.Go to the Macro Settings tab.Select the Disable VBA macros with notification option.Click the OK button.
3] Change default save location
By default, Excel saves all files in the Documents Library folder. However, at times, you might need to save them directly in another location so that you can access them quickly. The best thing is that you can change the default save location in Excel using the in-built settings. For that, do the following:
Open Excel Options.Go to the Save tab on the left side.Find the Default local file location option.Enter the new location in the same format as before.Click the OK button to save the change.
Read: How to change the default Save location in Office
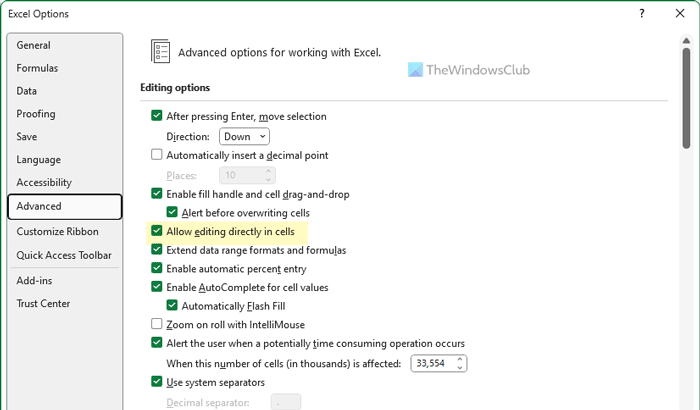
4] Do not allow editing directly
When you click on a cell, it lets you edit it directly. In some situations, it could be a problem since you might end up editing a cell that you were not supposed to do so. That is why you can prevent yourself from editing any cell directly. For that, follow these steps:
Open the Excel Options panel on your PC.Switch to the Advanced tab on the left side.Find the Allow editing directly in cells option.Remove the tick from the checkbox.Click the OK button.
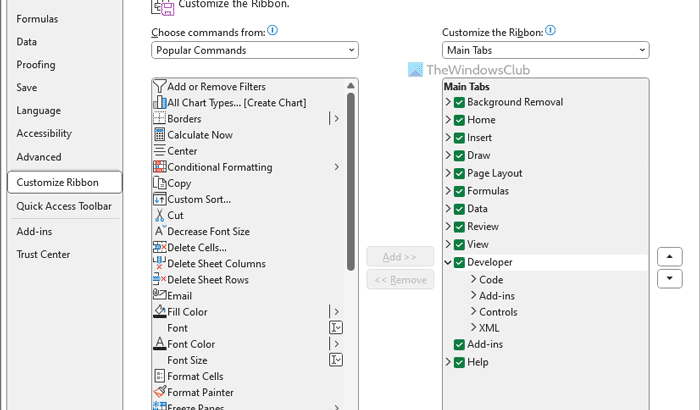
5] Enable Developer tab
The Developer tab includes several options for Excel. For example, you can use Visual Basic scripts, record and use macros, use Relative References, install add-ins, and more. However, this tab is not available by default due to security concerns. If you want to use all those options, you can follow these steps to add the Developer tab in Excel:
Open Excel Options wizard on your computer.Switch to the Customize Ribbon tab on the left-hand side.Find the Developer option on the right-hand side.Tick the checkbox.Click the OK button to save the change.
Read: How to add Developer tab in Word and Excel Office programs
6] Switch to R1C1 reference style
By default, Excel denotes columns with English letters, e.g., A, B, C, D, etc. On the other hand, it denotes rows with digits, e.g., 1, 2, 3, 4, etc. However, if you need digits on both sides, you need to switch to the R1C1 reference style. Although you can enable R1C1 in Excel using Local Group Policy Editor as well as Registry Editor, you can also do that using the in-built settings. For that, do the following:
Open Excel Options panel.Go to the Formulas tab.Find the R1C1 reference style option.Tick the corresponding checkbox.Click the OK button.
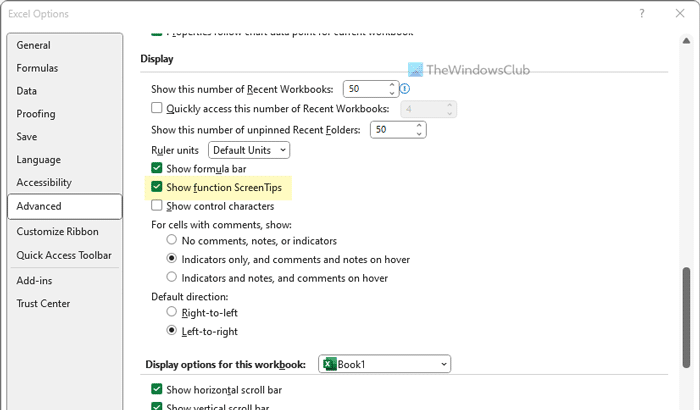
7] Turn Off ScreenTips
ScreenTips are helpful when you are new to a program. In case you don’t know, ScreenTips shows brief information about the option, tool, function, command, etc., so that you can know what you are about to use. It displays text in a bubble when you hover your mouse on an option or anything else in Excel. However, it is not that handy when you are already used to a program. That is why follow these steps to turn off ScreenTips:
Open Excel Options panel.Go to the Advanced tab.Head to the Display section.Find the Show function ScreenTips option.Remove the tick from the checkbox.Click the OK button.
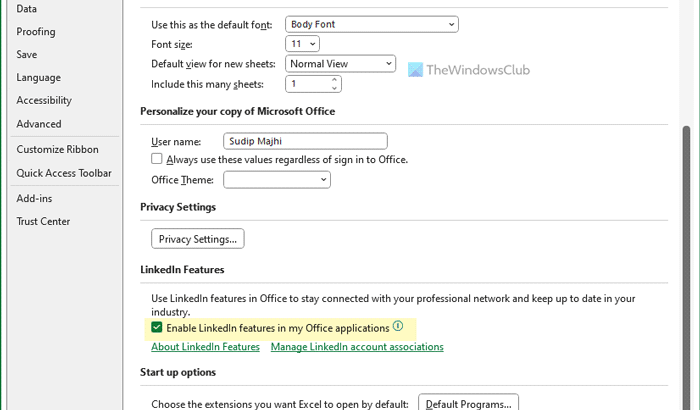
8] Disable LinkedIn
The LinkedIn feature is handy in Word and PowerPoint. However, the same is not that useful for Excel users. If you use the latest version of Excel or Microsoft 365, you can find a LinkedIn feature implemented into Excel and all the other Office apps. In case you don’t need it, you can simply disable the LinkedIn feature in Excel using these steps:
Open Excel and click on the Options menu.Ensure that you are in the General tab.Head to the LinkedIn Features section.Find the Enable LinkedIn features in my Office application option.Remove the tick from the checkbox.Click the OK button.
Read: How to enable or disable LinkedIn Resume Assistant in Word
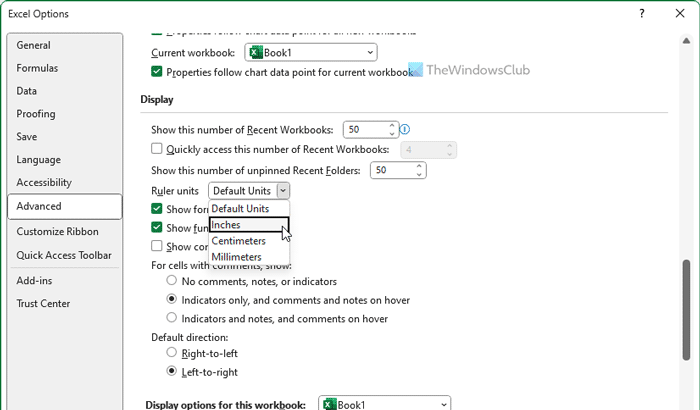
9] Default ruler unit
Although Excel users do not need the Ruler all the time, like PowerPoint or Word, it may be handy in some cases. If you often make charts and add shapes to your sheet, and you need to align them in some way, Ruler is a handy tool you must have. However, if you do not always comprehend the default unit of the ruler, you can change it accordingly. For that, do the following:
Open Excel Options panel.Go to the Advanced tab.Find the Display section on the right-hand side.Expand the Ruler units drop-down list.Choose a unit that you like to use.Click the OK button.
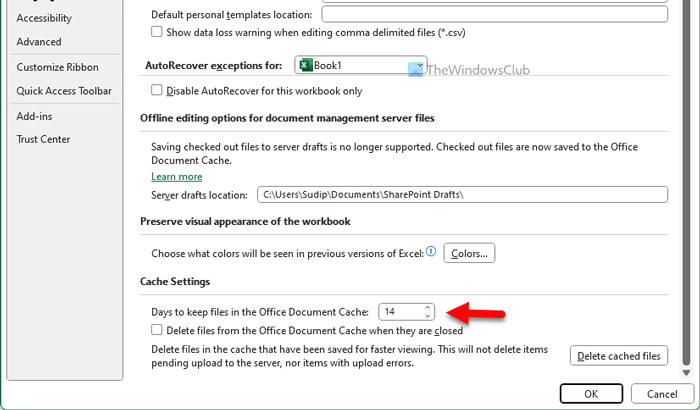
10] Default cache time
By default, Excel keeps the file cache for 14 days on your computer. Following that, it deletes the cache automatically and without prior permission. However, if you want to increase or decrease this time period, here is how you can do that:
Open Excel Options wizard on your PC.Switch to the Save tab.Find the Cache Settings section.Change the time accordingly.Click the OK button.
Also read: Default Microsoft Word settings you need to change
What is the Excel default format?
The default format of Excel is .XLSX. However, you can change the format using the in-built settings panel of Microsoft Excel. For that, go to Save in the Excel Options panel and find the Save files in this format setting. Next, choose a format as per your requirements.
How do you reset Excel to normal view?
Excel can display data in different views – Page Break Preview, Page Layout, and Custom Views. However, if you want to revert all those changes and switch to the default view mode, you need to go to the View tab first. Then, find the Normal option, and click on it.