Windows applications and processes are prioritized based on the following levels:
Realtime.High.Above normal.Normal.Below normal.Low.
The higher up the priority level assigned to the process, the more processor resources it uses; hence, the better the performance of the application using the process. The Windows system automatically assigns the priority levels to the running processes based, but you can change the level manually. This guide will show you three ways to carry out this operation. Note that although you can easily set process priorities, it’s only temporary because the process reverts to its default priority level when you close the program or reboot your computer.
How to change the process priority level in Windows 10
There are three ways to change the priority level of processes running on your machine. You can do this using the following methods: Read on to learn how to carry out the above operations using without running into serious complications.
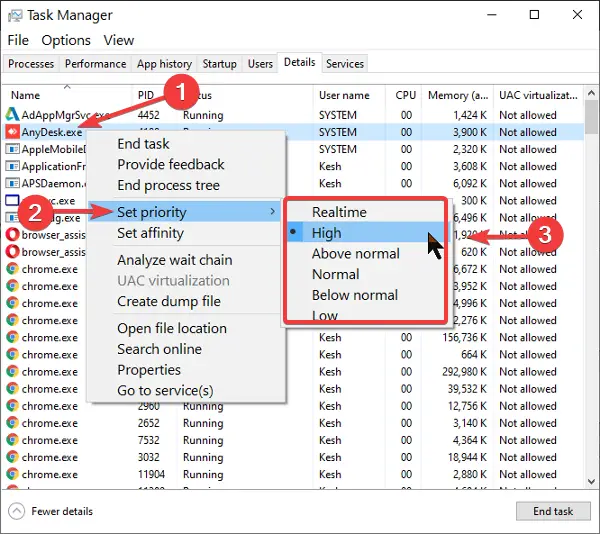
1] Change the priority in Task Manager
To set the priority in Task ManagerRight-click on the Start button and select Task Manager. Click on the downward-facing arrow at the bottom of the Task Manager screen for More details. Switch to the Details tab at the top of the window. Here, find the process for which you wish to change its priority and hover on Set priority. From the context menu, select the priority level for the chosen application or process. You can choose between the given priority levels. Hit the Change priority button and close the Task Manager.
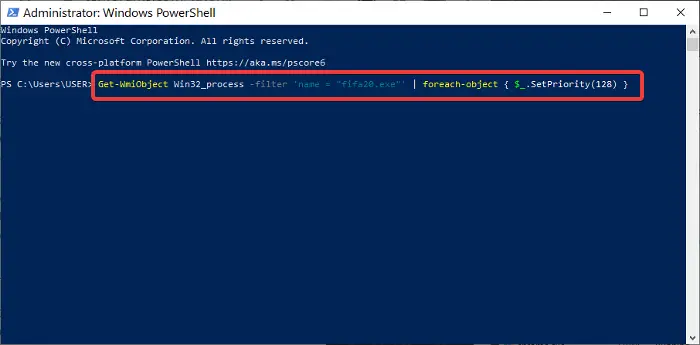
2] Set the process priority using PowerShell
Unlike in the Task Manager method, PowerShell doesn’t name the priority levels in English terms. Instead, you have to set the priority level using designated IDs. The table below shows the various priority levels and their corresponding IDs: With that said, follow the steps below to change program/process priority levels using PowerShell. Press the Windows key and search for PowerShell. Click on the program from the search results. In the PowerShell window, enter the following command and hit ENTER.
In the command above, replace ProcessName with the name of the process or application for which you wish to change its priority level. Similarly, change PriorityLevelID to the priority level number.
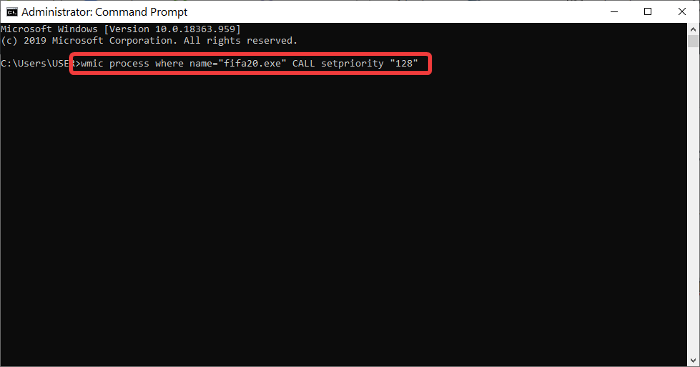
3] Set the priority level using Command Prompt
Press the Windows key + R combination to bring up the Run dialog box. Here, type in cmd and press ENTER. In the Command Prompt window, enter the command below and press ENTER.
NOTE: In the above command, replace ProcessName with the name of the process whose priority level you want to change. Also, performing this operation with this command, like in PowerShell, uses the designated priority level IDs. So, when inputting the command above, be sure to replace PriorityLevelID with the corresponding ID from the table in the previous solution. If you wish to make use of the actual priority level names as we did in the Task Manager method, you can use the command below. For this command, remember to also replace ProcessName with the name of the application/process, and PriorityLevelName with the priority level you want to use (Realtime, High, Above normal, Normal, Below Normal, or Low). NOTE:
This post will show you how to SAVE theProcess PrioritySee this post if you can’t set Process Priority in Task Manager.
Having learned the three ways to set process priority levels in Windows 10, I must warn you against putting programs to the realtime priority level. This lets the process use the maximum amount of resources and will hamper the performance of other applications.