Windows Provisioning Packages
Provisioning packages can be considered a group of commands that makes a device ready for use. Though intended for commercial use, these packages can also be used to restore devices for personal use. The provisioning packages can be used to program multiple devices so you can put it to a variety of uses instead of restricting the usage to offices. For instance, you can provision your mobile phone and tablet to have the same set of rules related to lock screen, wallpaper and apps etc. You can configure the following using a provisional package: Provisioning packages can be used via an email, a SD card, direct PC to device connection (recommended) and USB Flash drive.
Benefits of Provisioning Packages in Windows
With services such as Bring Your Own Device (BYOD) or Bring Your Own Service (BYOS) gaining momentum in the corporate sector, you have to configure each device properly so that the corporate data is not at risk. You can apply rules manually but that would be a tedious task if you have many employees. To counter this, use the provisioning packages for Windows devices. You can build a provisioning package using the Provisioning Package Wizard and then use the Wizard to deploy the rules etc. to different devices just by running the package on each device. This saves tremendous work and time. You can configure a new device using the provisioning package thereby eliminating the need for imaging. You can quickly configure an employee-owned device without having to go for Mobile Device Management or Enterprise Data Security in Windows. In short, provisioning packages are key to saving time and effort when it comes to configuring or re-configuring devices used by employees – whether the device is provided by the company or is employee owned.
Building a Provisioning Package in Windows
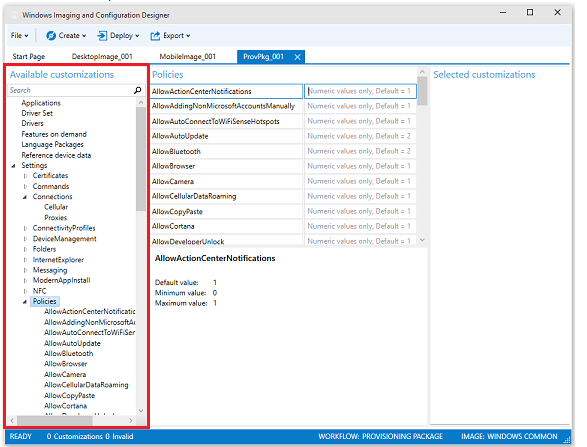
You will have to use Windows Imaging and Configuration Designer (Windows ICD) to create and configure devices. A provisioning package will have an extension as .ppkg and will contain the customizations you will choose using the Windows ICD. The provisioning page will look somewhat like the image below. From the set of available options in the left pane, when you select one, you will see the rules in right pane. Select the ones what you wish to include in the provisioning package.
Note that the components available will be based on the edition of Windows you select. It is not necessary that you will see exactly the same window options in your Windows ICD as shown in the image. It will differ for different editions so you need not worry if you can’t find an option.
Applying the Provisioning Packages to Windows devices
At the moment, since the final build is not yet out, you can experiment with the Windows Insider program. You will have two options: configure a PC or configure a phone. To configure a PC, you can apply the configuration during deployment or during runtime. The latter is easier as you just have to double click the provisioning package and click on Allow to let the package configure the device. To configure a PC during deployment, you will have to use Windows ICD command line. For mobile phones, you cannot use the provisioning package at deployment. You have to use it at runtime and it is similar to the method for PC. Just connect the mobile device to PC using a USB cable and double click on the provisioning package. Click Allow to let the package configure your device. You can see how easy it becomes to set up and configure devices with provisioning packages in Windows 10. You do not have to do it manually for each device and in case of large organizations, you save plenty of days provisioning the devices that the employees use.

