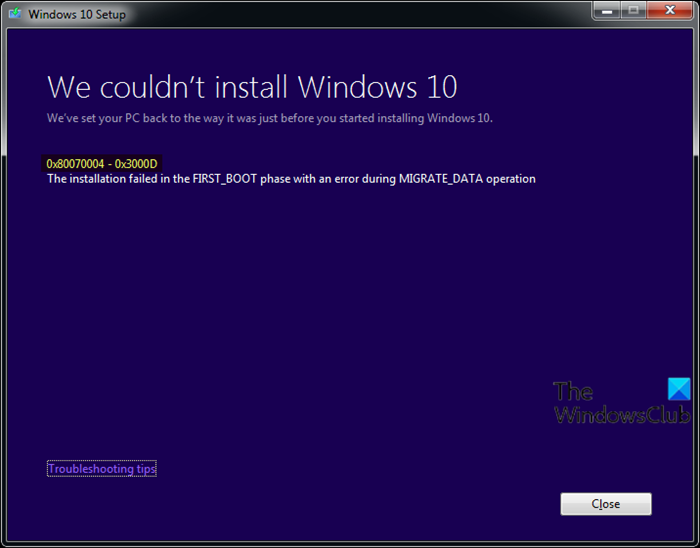
When you encounter this issue. you’ll receive the following full error message; When you encounter this error, the installation will stop at a certain percentage and fail repeatedly whenever you try. Most We couldn’t install Windows 10We’ve set your PC back to the way it was just before you started installing Windows 10. 0x80070004 – 0x3000DThe installation failed in the FIRST_BOOT phase with an error during MIGRATE_DATA operation
Windows 10 Upgrade install error 0x80070004 – 0x3000D
If you’re faced with this issue, you can try our recommended solutions below in no particular order and see if that helps to resolve the issue. Let’s take a look at the description of the process involved concerning each of the listed solutions.
1] Change Computer Name (if applicable)
If the any of the following is your computer name, you’re most likely to encounter the error 0x80070004 – 0x3000D while upgrading your computer to Windows 10:
System (or SYSTEM)LOCALSELFNetwork
These are reserved names and must not be used for Computer name. Hence you need to change the computer name in the Windows PC you are upgrading from. If you’re still unable to upgrade after these changes, you can try the next solution.
2] Verify the location of Users folder and the state of User Profiles
It might be that the Users directory was moved or relocated and Windows 10 installer couldn’t find user profiles on the %systemdrive% i.e. where the current operating system is installed. This case is applicable to both Windows 7 and Windows 8. If you had any changes or moved your folders of “Users”, “Program Data” or “Program files”, or user profiles of the operating system got corrupted, you may encounter this issue. Hence before upgrading to Windows 10, you’re required to re-install or reset/repair your current operating system. However, if you’ve not moved any of your folders, then it’s likely your user profiles are corrupted. So, rather than reinstalling Windows, you can check if your computer has any corrupt user profile. Here’s how:
Press Windows key + R to invoke the Run dialog.In the Run dialog, type sysdm.cpl and hit Enter to open System Properties.On the Advanced tab, click Settings button available under User Profiles section.Make a note of all the accounts you have on a paper and then sign out from your current user account and try logging in the accounts you have on your computer.If you get error in logging in any of the account, come back to User Profiles and delete that account.
Once done, try the upgrade install again. If the issue persists, continue with the next solution.
3] Create a new Administrator account
This solution simply requires you to create a new administrator account or enable the inbuilt administrator account, then log into that account and perform the Windows 10 upgrade install from there.
4] Delete the file named TODO
If by any chance, you have Orbx (Microsoft Flight Simulator) program installed on your computer, then you need to delete the TODO file from the Orbx folder. Do the following:
Open up File Explorer or Windows Explorer and configure Windows 7/8 to show protected operating system files.Navigate to the following directory:
In the above path, C is the drive where Windows 7/8 is installed, and UserName is your account name.
Under ORBX folder, check if there is a file called Todo. If the file exists, delete the file.Restart computer.
Retry the Windows 10 upgrade install. The process should complete without any errors. Otherwise, proceed with the next solution.
5] Create or Modify the AllowOSUpgrade registry key
Since this is a registry operation, it is recommended that you back up the registry or create a system restore point as necessary precautionary measures. Once done, you can proceed as follows:
Press Windows key + R to invoke the Run dialog.In the Run dialog box, type regedit and hit Enter to open Registry Editor.Navigate or jump to the registry key path below:
At the location, on the right pane, double-click the AllowOSUpgrade entry to edit its properties.
If the key is not available, right-click on the blank space on the right pane and then select New > DWORD (32-bit) Value. Rename the value name as AllowOSUpgrade and hit Enter.
Double-click the newly created entry to edit its properties.Input 1 in the Value data field.Click OK to save changes.Restart your computer.
On boot, retry the Windows 10 upgrade install. If the issue is still unresolved, try the next solution.
6] Directly download the Windows 10 ISO
It’s possible that for some reason, using the Media Creation tool aka Windows Update Assistant might be causing this issue. In which case, you can directly download the Windows 10 ISO image file from the Microsoft website. Once you have downloaded the ISO to a location (preferably the desktop) on your device, double-click the ISO image to mount it as a virtual drive and then double-click the setup.exe file to start the in-place upgrade process. Note: If you’re attempting the upgrade from Windows 7, you’ll need a third-party virtual drive software to mount the ISO image.
7] Clean install Windows 10
If all fails, you can clean install Windows 10 on the device. Similar Error Codes:
Error Code 8007001F – 0x3000DError Code 800704B8 – 0x3001AError Code 0xC1900101 – 0x30018Error Code 0x800707E7 – 0x3000D.
Hope this helps!